One of the most important items for a haunt wiether it is a home/yard haunt or a commercial haunt is lighting, especially colored light!
The trick is type, location, position, and color. Keep in mind there is no right or wrong way to do lighting it all depends on what look you like or what items you want seen.
Another thing to keep in mind while planning your lighting plan is that no matter how simple your plan is lighting takes a long time to set up. From hanging light fixtures to running extension cords across the yard. Keep it as simple and if you are able to set up and/or test in advance.
Types
* Everyone knows you can go to just about any store especially around Halloween time and purchase colored light bulbs, "Party Bulbs". These are regular light bulbs painted different colors and these work great on porches, lamps, lightbases, in props, & scenes.
* You can also buy colored twisted flourscent bulbs that screw into a regular light socket. These have a very strong color, much brighter & deeper! Also, they don't use as much energy or get as hot as regular bulbs! I have started using these in my haunt rather than the regular colored bulbs, and using the "black light" twisted bulb works great, you get a "true" black light effect from the bulb!
* Mini Spotlights are another new Haunt lighting item. They are Mini Spotlights made from super bright leds. They are about 2 inches long the base has a small hole to attach by nail or screw to walls or boards. You can aslo pivot the light and when in the desired position tighen the pivot screw to keep in place! These lights are available in many colors including UV (a true black light).
Since these lights are tiny the light up a "small" area and not the whole wall or room. For example, if you have a scary portrait in a hallway and you want guests to see the portrait but want to keep the hallway dark you could use a mini spotlight and this will illuminate only the portrait keeping the surrounding space dark. Great for props, portraits, scenic highlights, etc!
* LED Spotlights are regular sized spotlights with a few or many leds together (depending on the intensity) to make the light. These use very little power and can be placed in regular "spotlight units" with a screw base allowing for indoor or outdoor useage. Many different companies make these just type led spotlights into your search engine.
* Another haunters favorite is the Par36 Pinspot this light, when placed across a yard can brightly light an area about 3 feet in diameter. They are a bargain at approximately $10 each. They come ready to be hung or mounted and they come with a real 3 prong power cord instead of bare wire. Unlike flood lights, pin spots don't illuminate the whole area. You can use regular bulbs or led in this unit. You can purchase these from DJ lighting stores either local or online.
Location & Position
*One thing to always keep in mind is to make sure the source of your lighting is hidden or at least have the light positioned so that your guests can not see the bulb itself. Place other props or set dressings in front of your light (always making sure that your far enough way to not over heat any items in your scene - Safety First- don't make a fire hazard.
* Depending on what you are wanting to illuminate, abiously your locations will be different. strictly left or right light, shadows, warmth/coolness or light from the base of prop.
* If you want "natural sun or moon" lighting from above use a 45 degree angle hung in the front either upper left or right position.
* Place light source at the base of props for a real creepy shadowing effect.
*Try Mixing colors - if you place a prop in the middle have one light (for example blue) on the left side in front and a different color (for example red) on the right in front, where the two colors meet you will get some really cool shadows and color blending (from our example purple). This also makes for some great photos.
Color
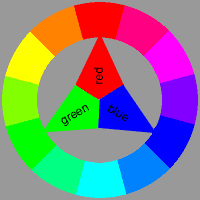
Mixing colors can be a very cool effect to add to your scene or props. One thing to remember is that mixing colored light is different than mixing paint. Below is a color wheel to help.
* Additive Color, This color wheel displays the additive colors used for projected light. When mixed together the additive primaries form white. The primaries are red, green and blue. These colors are extremely bright because light that is projected can be far more intense than printed color.
ETC.
* Want to tone down the amount of light being emitted from the bulb? Try using some "heat resistant" spray paint (mainly used to repaint BBQ grills), just spray some onto the bulb itself until desired "dimming" is achieved.


 * Additive Color, This color wheel displays the additive colors used for projected light. When mixed together the additive primaries form white. The primaries are red, green and blue. These colors are extremely bright because light that is projected can be far more intense than printed color.